
O&O BuildPE is a Wizard that will help you create the boot media (CD, DVD or USB stick) for soume of your O&O programs. For example, you will need the boot media if you want to run your O&O program without prior installation. This might be necessary whenever Windows is not booting up due to errors caused by defective software. To get your Windows back on track, you can run O&O DiskImage from the boot media, and restore the system partition to its original condition – this of course is only possible, if you have previously created an image.
Data recovery using the O&O DiskRecoveryis also suited to boot media, since the installation of a data recovery product might overwrite key areas of the hard disk, making a later data recovery impossible.
Your boot medium also includes various O&O system rescue programs that allow you to access the Windows registry or stored files, even if Windows is corrupted or does not boot anymore.
Follow the steps in the Wizard to create the boot medium.
Please read the following tips:
- To download the required Windows AIK (Automated Installation Kit)/ADK (Automated Deployment Kit) you will need approximately 1.7 -4 GB of free disk space. The download may take up to a few hours depending on transmission rate. We recommend using a download manager.
- Be prepared with either a CD, DVD or USB stick when creating the boot media. No data can be stored on the removable medium, it must be completely empty.
- Your computer should have at least over 1 GB RAM memory available in order to run your boot media as intended.
- One of the following Windows operating systems must be installed on your computer: Windows 10, 8.1, 8, 7 or Server 2008 R2 (all Editions, 32 and 64 Bit). The creation of the boot media for O&O SafeErase Admin Edition and O&O SafeErase Tech Edition requires Windows 8 or higher.
Information and frequent questions about O&O BuildPE
1. Why does the download of the Windows AIK/ADK take so long?
The Windows AIK/ADK contains a data volume of 1.7- 4 GB. Depending on the transmission rate, this may take several hours to download.
2. Further information on the Windows AIK/ADK
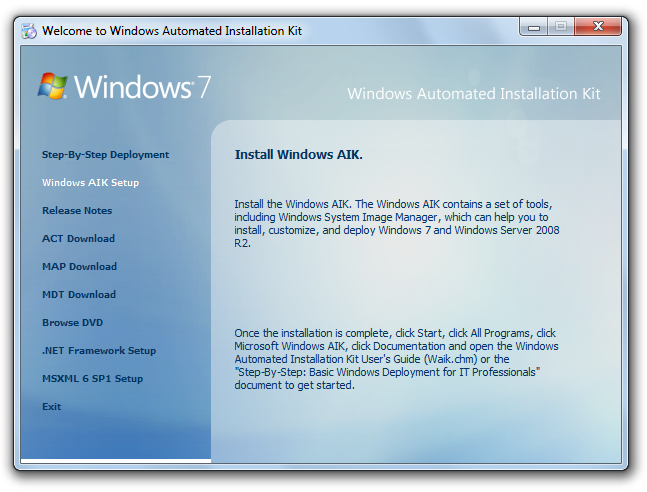
The Windows AIK (Automated Installation Kit)/ADK (Automated Deployment Kit) is used as an aid for installing, customizing and deploying the Microsoft Windows Vista ™ operating system family. By using Windows AIK/ADK, you can perform unattended Windows installations, capture Windows images with ImageX, and create Windows PE images. To use the Windows AIK/ADK, you must first download the ISO file. This download requires that you use a genuine Microsoft Windows. You can then install the Windows AIK/ADK, and store it together with the O&O packages on CD/DVD or USB Stick in just a few quick steps.
3. Notes on the Windows AIK/ADK installation
The Windows AIK (Automated Installation Kit)/ADK (Automated Deployment Kit) is available as a CD image (*. iso) after the download. For an installation, it must be either extracted or needs to be mounted as a virtual drive. O&O BuildPE automatically mounts a virtual drive so that you can run the Windows AIK/ADK installation without executing additional programs.
- Click on Windows AIK/ADK Setup in the welcome dialogue to initiate the installation.
- Specify a location for the *.iso file. You will need at least 1,7 GB free space.
- Follow the instructions in the dialogue for the installation.
4. What should be considered when choosing the base version?
There is a stand-alone AIK/ADK version for every Windows version. To avoid compatibility problems, you should always use the version that is available for your current Windows build.
5. What steps are being completed while creating a CD image?
The creation of the CD image proceeds as follows:
- The Windows PE environment is created and will then be temporarily mounted.
- The required base package will be added to the Windows PE environment.
- If you have already selected an O&O package, such as O&O DiskImage, it will be added to the Windows PE environment.
- The Windows PE environment is unmounted.
- The CD image environment is created.
- The CD image is created.
6. Why should I cancel the creation?
The creation of your removable medium should not be interrupted. This will render it useless. Rewritable media such as USB Sticks or CD-RWs can be re-used for several creation processes. One-time writable media, such as CD-Rs, are useless if the creation is interrupted or has been cancelled.
7. Why does it take so long to cancel?
While creating your O&O CD image the default Windows PE environment is temporarily mounted, so that it will be executable for your selected O&O product. To leave no residual data on your computer and remove all temporary files, the Windows PE environment needs to be unmounted. The mounting and unmounting process may take several minutes.
8. Which disks are supported?
The following disks are supported by O&O BuildPE for saving O&O CD ISO files:
- All Windows-recognized and formatted USB removable drives.
- Any empty, writeable, and unformatted CD-R/RW, DVD-R/RW, DVD+R/RW, BD-R/RE, HD-DVD-R/RW that is supported by your hardware.
9. This is how you boot your computer from a boot medium
After having successfully created your boot medium, you can use it as described below:
- Connect the boot medium (USB Stick) to your computer or insert the CD/DVD in the drive.
- Now restart your computer.
Start from CD/DVD:
- Make sure that your system can be booted from the CD / DVD. Corresponding settings can be specified in the BIOS. For more information, contact your motherboard manufacturer.
- Follow the instructions to boot the CD/DVD.

- After booting successfully, the corresponding program will be started.
Start from USB Stick
- To boot from a USB Stick, you must usually modify the boot sequence in the boot menu of your computer. Alternatively, you can specify the appropriate settings in the BIOS. For more information, contact your motherboard manufacturer.
- Open the boot menu while the computer is booting.
- Change the sequence in the menu by placing the USB entry (removable devices) at first rank.
- The computer will then recognize the USB Stick as boot medium, and start the program from there.
Note: The sequence in the boot menu is normally only valid for the current computer status. This step might need to be repeated for the next boot up.
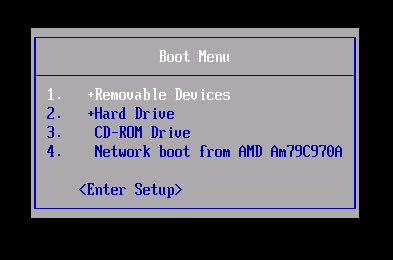
Examples for the boot menu
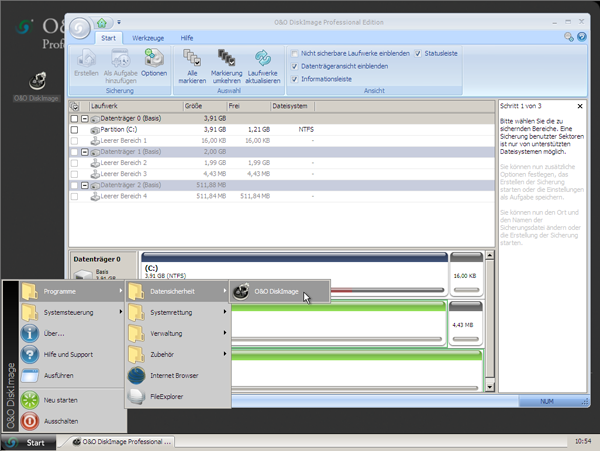
Example for the O&O Start menu under Windows PE, here O&O DiskImage
10. Load Driver
- If you already know when creating your boot media that you need additional drivers, click in the Assistant on Create CD Image and on Load Driver.
- Then navigate to the desired driver directory, such as *.inf, *.sys, *.dll, or *.cat, and select the one you want. The driver will then be loaded.
- If you only remember later when using your boot media that you need additional drivers, you can still download them, even during the boot process and before starting the program, by using the driver management. You can learn more about this in the appropriate help section.
Example: Loading an Intel RAID Driver or Intel Network Driver
- Go to Intel.com/Support in the internet and download the desired driver (RAID/Network) and save this on your computer.
- Unzip the file and select this directory when using BuildPE under Create CD Image/ Load Driver.
If you have an installation CD for your network card or the motherboard, you can also download the driver from there.
You should then proceed to create the boot medium per the instructions in the dialog field.
- Click on Windows AIK/ADK Setup in the welcome dialogue to initiate the installation.
- Specify a location for the *.iso file. You will need at least 1,7 GB free space.
- Follow the instructions in the dialogue for the installation.
- The Windows PE environment is created and will then be temporarily mounted.
- The required base package will be added to the Windows PE environment.
- If you have already selected an O&O package, such as O&O DiskImage, it will be added to the Windows PE environment.
- The Windows PE environment is unmounted.
- The CD image environment is created.
- The CD image is created.
- All Windows-recognized and formatted USB removable drives.
- Any empty, writeable, and unformatted CD-R/RW, DVD-R/RW, DVD+R/RW, BD-R/RE, HD-DVD-R/RW that is supported by your hardware.
- Connect the boot medium (USB Stick) to your computer or insert the CD/DVD in the drive.
- Now restart your computer.
Start from CD/DVD:
- Make sure that your system can be booted from the CD / DVD. Corresponding settings can be specified in the BIOS. For more information, contact your motherboard manufacturer.
- Follow the instructions to boot the CD/DVD.
- After booting successfully, the corresponding program will be started.
Start from USB Stick
- To boot from a USB Stick, you must usually modify the boot sequence in the boot menu of your computer. Alternatively, you can specify the appropriate settings in the BIOS. For more information, contact your motherboard manufacturer.
- Open the boot menu while the computer is booting.
- Change the sequence in the menu by placing the USB entry (removable devices) at first rank.
- The computer will then recognize the USB Stick as boot medium, and start the program from there.
Note: The sequence in the boot menu is normally only valid for the current computer status. This step might need to be repeated for the next boot up.
Examples for the boot menu
Example for the O&O Start menu under Windows PE, here O&O DiskImage
- If you already know when creating your boot media that you need additional drivers, click in the Assistant on Create CD Image and on Load Driver.
- Then navigate to the desired driver directory, such as *.inf, *.sys, *.dll, or *.cat, and select the one you want. The driver will then be loaded.
- If you only remember later when using your boot media that you need additional drivers, you can still download them, even during the boot process and before starting the program, by using the driver management. You can learn more about this in the appropriate help section.
Example: Loading an Intel RAID Driver or Intel Network Driver
- Go to Intel.com/Support in the internet and download the desired driver (RAID/Network) and save this on your computer.
- Unzip the file and select this directory when using BuildPE under Create CD Image/ Load Driver.
If you have an installation CD for your network card or the motherboard, you can also download the driver from there.
You should then proceed to create the boot medium per the instructions in the dialog field.